Manual Customer RemoteSim Setup
Overview
For customers not wishing to have Travel Data perform the setup of their router via InControl2, please follow this guide to configure your router. Use the details provided to you by our Activations Department. If you're not comfortable performing these steps, please reply to your activation email and someone from our Peplink team will perform the configuration for you remotely via InControl2 system. We do find it to be a much simpler and more satisfying customer experience if our team performs the setup. Please also note that your Remote Sim may not function as intended with your router outside of the Travel Data InControl2 environment.
Firmware Below 8.4.0
Step 1-Enable the SIM Injector communication protocol
For a Balance cellular router, go to the Network (Top tab).
1b. For a MAX cellular router, go to the Advanced (Top tab).
2. Under Misc. settings (Left-side tab), find Remote SIM Management.
3. In Remote SIM Management, click on the edit icon next to Remote SIM is Disabled.
4. Enter the public IP of the SIM Injector and click Save and Apply Changes. Refer to your activation email for the correct IP address.

Do not use the IP address in the screenshot, it is for reference only.

Do NOT check Auto LAN Discovery.
- Adding a SIM Injector serial number to the Remote SIM Host field is a mistake!
Step 2. Enable RemoteSIM for the selected Cellular interface (Pre Firmware 8.4.0).
1. Go to Network (top navigation bar), then WAN (left navigation bar) and click Details for a
selected cellular WAN. This will open the WAN Connection Settings page.
2. Scroll down to Cellular settings. We strongly recommend using Cellular 2 (if it is available) for Remote Sim.
3. In the SIM Card section, select Use Remote SIM Only.
4. Leave Remote Sim Settings box as "Control by Fusion SIM Cloud"
5. Click Save and Apply Changes.
Firmware 8.4.0 and above
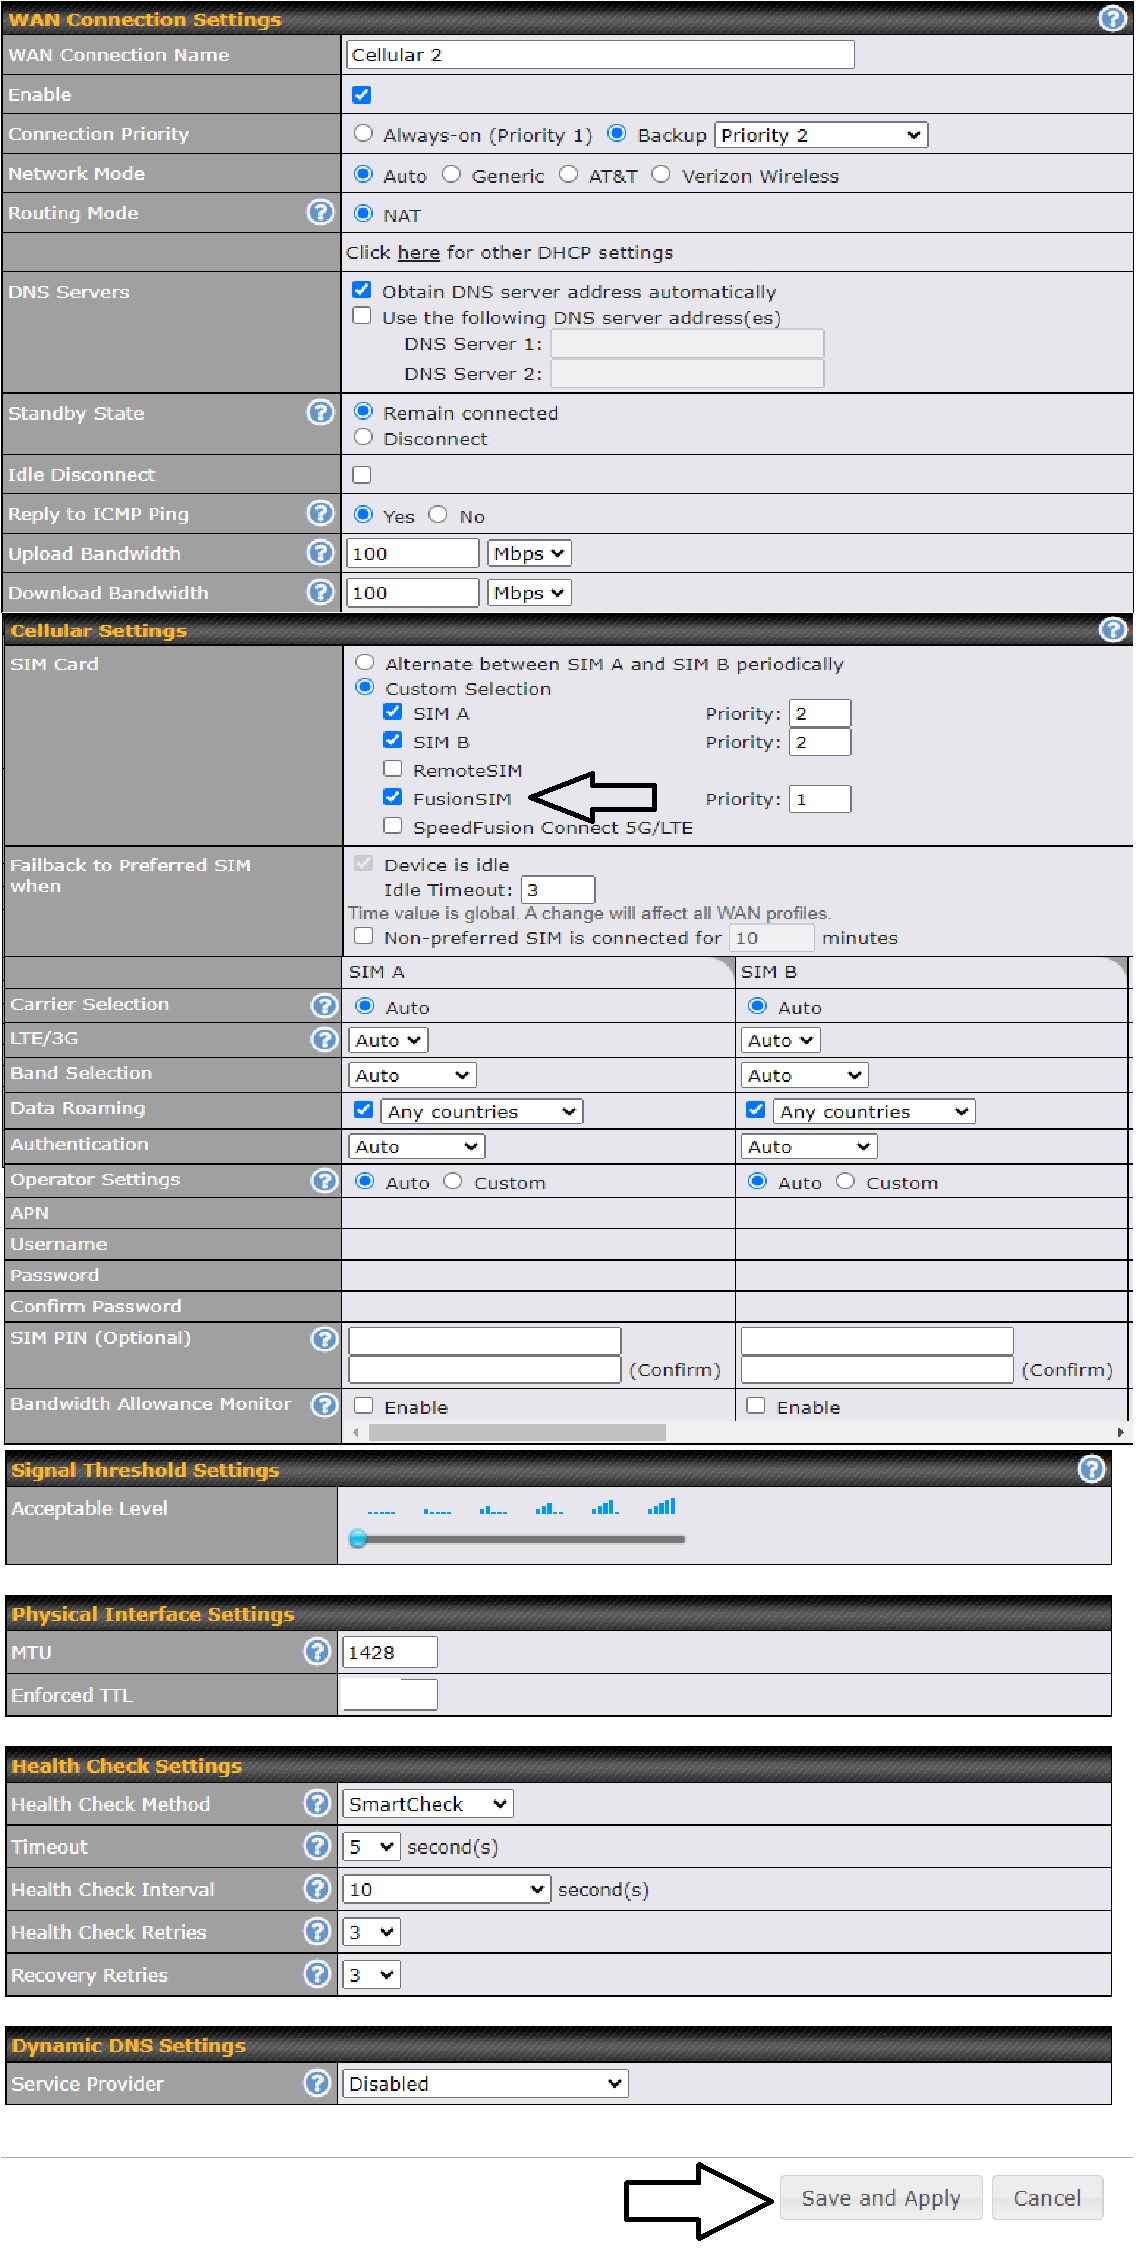
Step 1. Enable RemoteSIM for the selected Cellular interface (Firmware 8.4.0)
1. Go to Network (top navigation bar), then WAN (left navigation bar) and click Details for a selected cellular WAN. This will open the WAN Connection Settings page.
2. Scroll down to Cellular settings. We strongly recommend using Cellular 2 (if it is available) for Remote Sim.
3. In the SIM Card section, select Sim A, Sim B, and FusionSim, then apply all changes.

Step 3. Reply to your Activation Email
Please reply back to your activation email to let our team know your router has been configured, and we'll check the communication from our end.

In some cases, if the communication link fails to initiate, it will be mandatory to release your router from your current InControl2 environment so that our Peplink Certified Engineer can make configuration changes. At no time will you lose permission for your router, and your personal data will never be exposed.
Related Articles
NRadio First Time Setup
Setting up your NRadio router for the first time is quick and easy! While it will automatically set the correct options, you may need to adjust some items yourself. This guide will help you with the most common items. Step 1: Access the Router’s ...LT18 Setup Step 2
Now that your sim card is active, please follow this guide to continue the LT18 Setup. Standard LT18 Setup Steps In order for your equipment to be registered, you'll need to take a few simple steps to set up your router. First, connect to your ...Activation Setup for UOTEK Equipment
Travel Data provides complimentary remote setup and configuration of UOTEK routers that have or have not been purchased from our store directly via ZeroTier. So we may remotely complete the setup, please keep your routers admin password set to the ...First Setup for MikroTik Equipment
Overview Congratulations on your purchase of a MikroTik router! These are powerful devices, that host many features. Your Travel Data subscription will come with complimentary managed wifi for these devices. Below are the steps to enroll your router ...LT18 Setup Step 1
You should now have your sim card, and router. Please have them available as we'll now need some information from each. From your sim card, please locate the 19 digit sim card number From your router, please locate your MAC Address (MAC) on the ...